You’ve probably heard of the Facebook Conversion API (CAPI) as the next big thing for tracking your marketing performance. It’s been touted as the solution to all your tracking woes in a cookieless future. But what exactly is it, how does it work, and more importantly, do you really need it?
In this comprehensive guide, we’ll cut through the marketing jargon and technical complexities to give you a clear understanding of Facebook’s Conversion API, how it differs from the traditional pixel-only approach, and provide a step-by-step implementation guide using Google Tag Manager that actually works in 2025.
Do you need the Conversion API?
Before diving into the technical aspect of the implementation, addressing whether or not the conversion API is needed in the first place is a valid starting point. To make this easier to understand, we will break this down to what each side can and can’t do.
1. What Facebook’s conversion API can’t do
- Getting 100% match between your backend and meta reporting
One of the most frustrating aspects about tracking your online marketing performance is that you can’t exactly match your “real numbers” with what you see in Meta’s dashboards. A lot of businesses start implementing server-side with this wrong assumption only to discover there’s more to it.
You need users’ consent to legally track their behavior
Before sending data to Facebook, especially in a server-side context where you will be collecting emails, the last thing you want is to send this highly sensitive data to Facebook without a proper consent collection mechanism.
On the other hand, data quality will definitely improve as you can pass more user parameters when you move your data to the server. This is mainly due to the fact that more user data parameters can be sent to Facebook in hashed format. Fields like email, phone number, etc. will be sent along with your Lead event as an example to Facebook, which will enhance Facebook algorithms’ targeting capabilities.
- Guarantee X% more conversions
There is no guarantee you will be able to increase your conversion rate by a certain percentage. You might see an uplift, but of course the conversion rate depends on other external factors besides how much data you can collect: industry, consent opt-in rates, user experience on site, and so on.
2. What Facebook’s Conversion API Can Do
- Complete control over data shared with Facebook
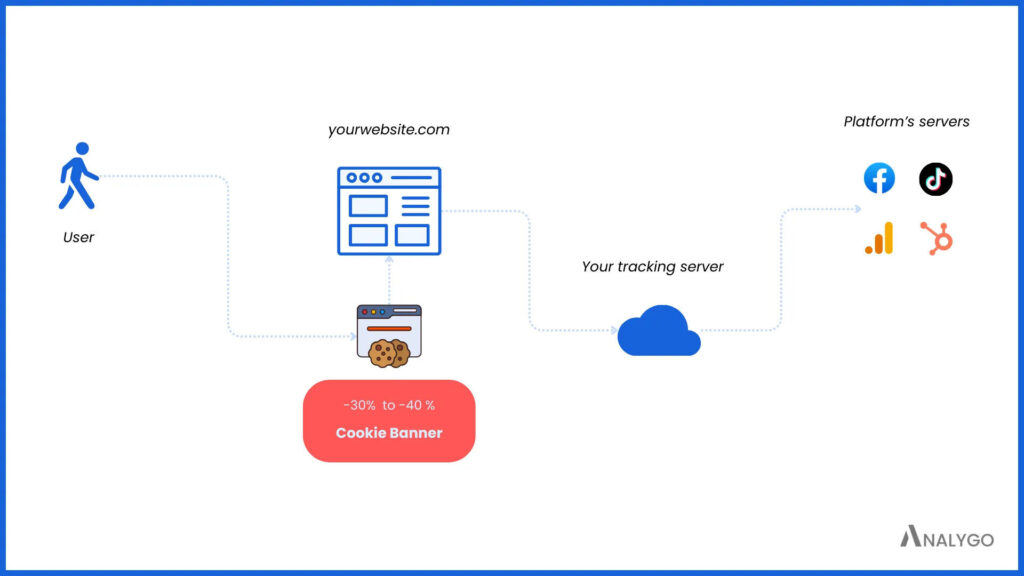
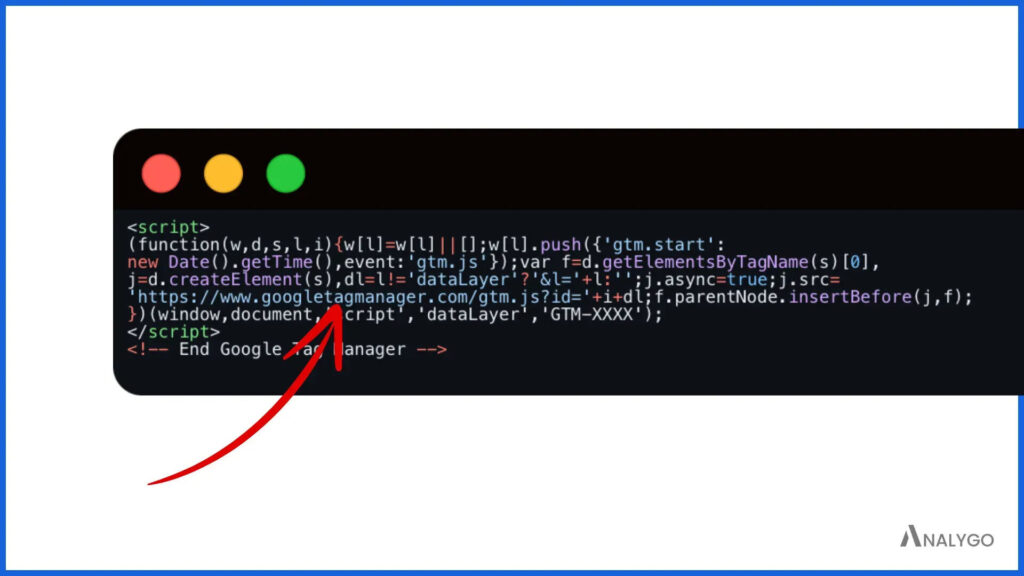
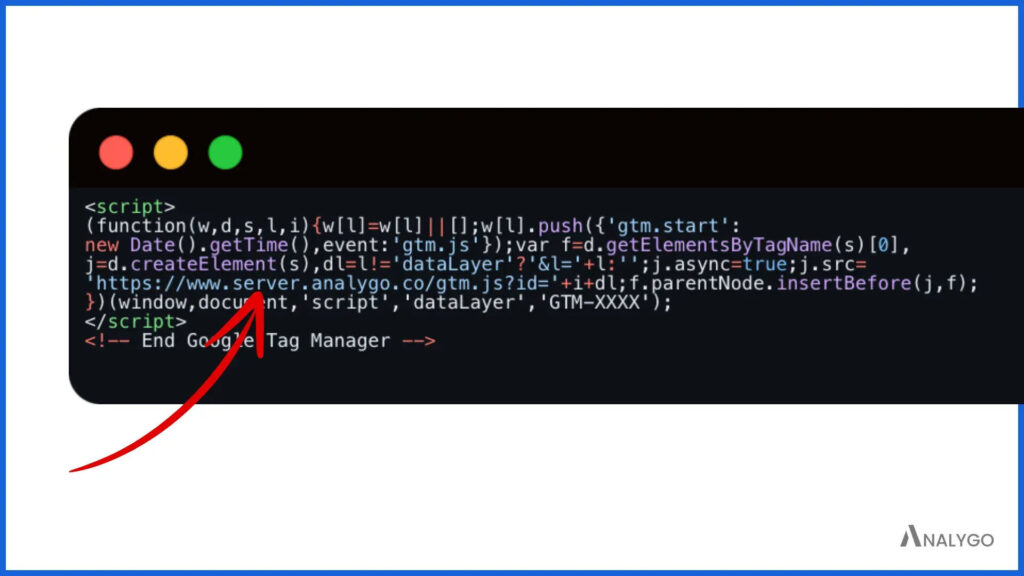
The real advantage of server-side tracking for Facebook is that you can load scripts from your own first-party domain. Although this may seem insignificant, a lot of data loss occurs because your scripts are easily blocked if they originate from sources like googletagmanager.com.
Your main domain might be example.com with a separate subdomain like server-gtm.example.com used for forwarding data to Facebook. Ad blockers have difficulty detecting this connection because it’s a subdomain rather than a recognizable Facebook endpoint.
Once you have your own server, your data collection capabilities become much broader. Server-side implementation introduces a buffer between Facebook and your website: you can add data (such as user emails) or remove sensitive information (such as IP addresses for certain regions like the EU).
This is much harder to pull off using the standard pixel as it has direct access to your website and thus can scrape any data without you having any control over this process. This is a major concern if your goal is to minimize the legal risk of collecting more personal data with a proper first-party context.
- Ability to enrich events sent to end platforms
Most businesses do not reach this step where server-side tracking evolves from being just a nice-to-have to a cross-channel integration tool where data from your offline sources stored in a CRM can be used to enrich existing events.
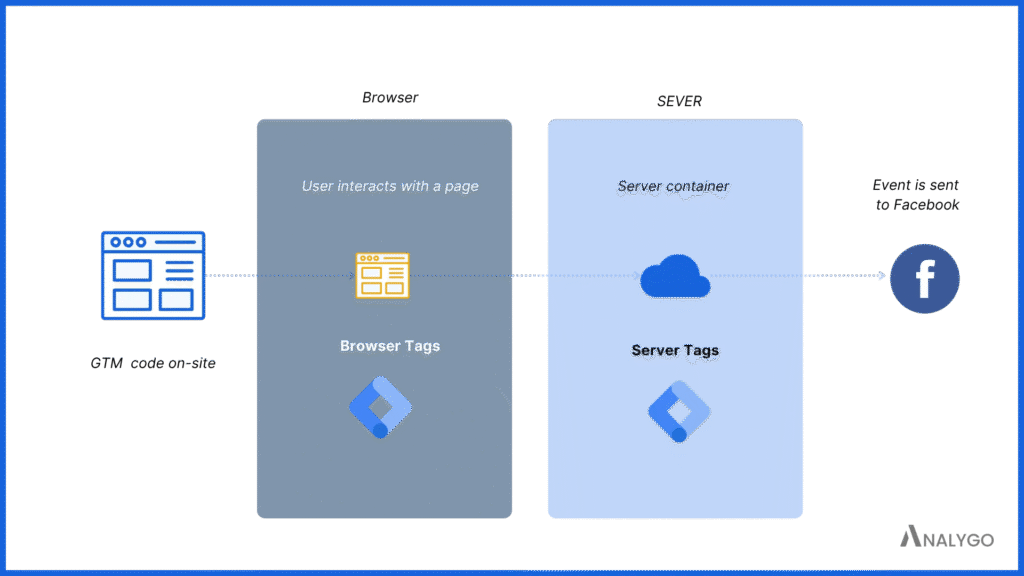
Although this is a tutorial about server-side tracking for Facebook, we will still rely on the browser side and configure pixel events. This is a point of debate, as some prefer to avoid this hybrid approach because it has performance drawbacks (extra loading time due to JavaScript code for each script).
But the tradeoff can be worth it as most platforms will rarely recommend setting up server side on its own for the time being. Our configuration will then have 2 parts:
- Client-side: on the client-side, the goal is twofold: pass all parameters needed to our server URL, and configure Facebook’s web tags.
- Server-side: on server-side we will have almost an identical set up for Facebook tags.
Example: E-commerce (client-side configuration)
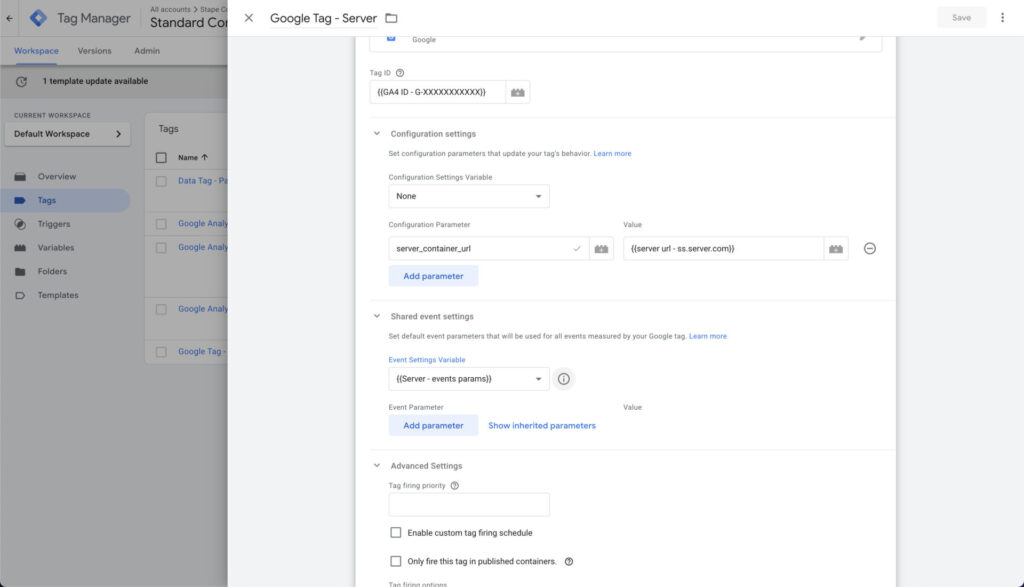
We will use a Google Tag as a way to transfer data from browser to server. This is accomplished by adding an extra field, the server_container_url, in the Configuration settings section.This field works alongside other parameters you want to send to the server, such as email, first_name, etc.
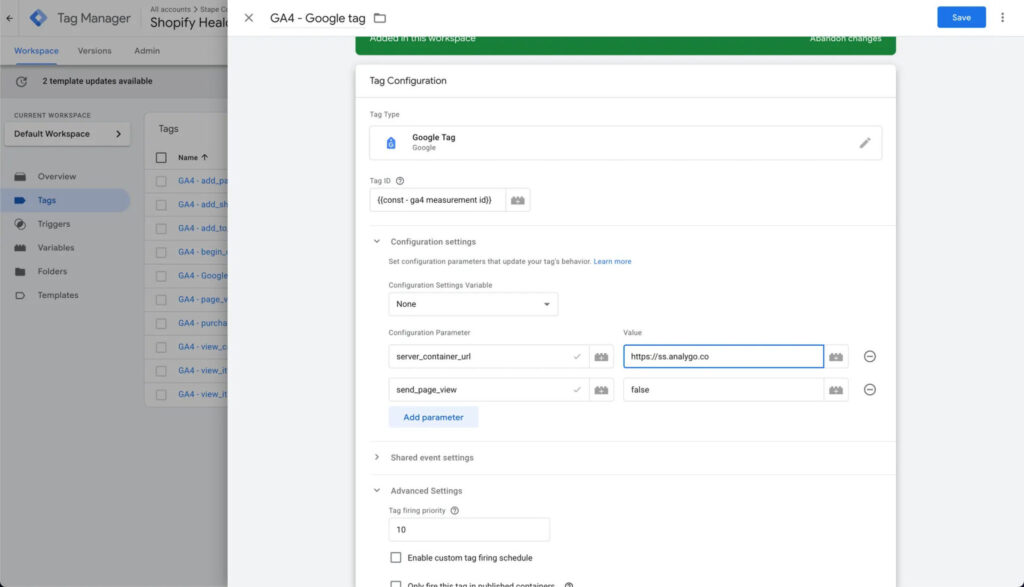
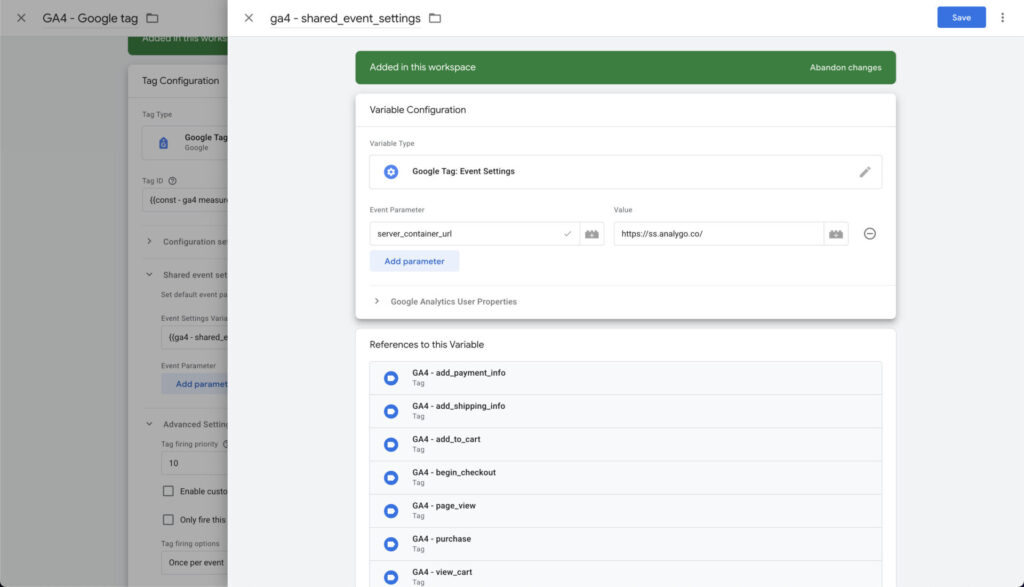
We also recommend adding the server_container_url to the Event Settings section as a backup in case the Google Tag fires after the event tag.
Event Tags Configuration: Crafting Your Facebook Conversion Strategy
When implementing Facebook’s Conversion API, understanding which events to track and what parameters to include is crucial for maximizing your marketing ROI. Let’s explore the key components that will power your data-driven marketing strategy.
- Sending personal data using server GTM
The real edge of using the conversion API is that you will be able to send first party data, but you need to ensure they are properly handled to avoid getting into issues. Below are some of the parameters we share with Facebook.
PII parameters must be normalized and hashed server-side before sending to Facebook. Use this table to decide what to hash and what impacts your Event Match Quality.
High Impact Parameters – These parameters have the greatest effect on match quality and should be prioritized
| Parameter | Should Be Hashed | Quality Score Impact | Example (Before Hashing) | Note |
|---|---|---|---|---|
| Yes | High | [email protected] | PII – Must be hashed | |
| phone | Yes | High | +15555555555 | PII – Must be hashed |
| external_id | Yes | High | user_12345 | PII – Must be hashed |
| content_ids | No | High | [“ABC123”, “XYZ789”] | Not PII but critical for matching quality |
| value | No | High | 49.99 | Not PII but essential for optimization |
| currency | No | High | “USD” | Not PII but required with value parameter |
| order_id | No | High | “ORD-12345” | Not PII but important for deduplication |
| fbp (Facebook Browser Pixel) | No | High | fb.1.1554763741205.1839135799 | Critical for cross-device matching |
| fbc (Facebook Click ID) | No | High | fb.1.1554763741205.AbCdEfGh | Critical for attribution |
Demographic Parameters – These provide medium impact on match quality and help with audience segmentation
| Parameter | Should Be Hashed | Quality Score Impact | Example (Before Hashing) | Note |
|---|---|---|---|---|
| first_name | Yes | Medium | John | PII – Must be hashed |
| last_name | Yes | Medium | Smith | PII – Must be hashed |
| city | Yes | Medium | New York | PII – Must be hashed |
| state | Yes | Medium | NY | PII – Must be hashed |
| zip | Yes | Medium | 10001 | PII – Must be hashed |
| country | Yes | Medium | US | PII – Must be hashed |
| date_of_birth | Yes | Medium | 1990-01-01 | PII – Must be hashed |
| gender | Yes | Medium | m | PII – Must be hashed |
Content Parameters – These provide context about what the user is interacting with products on page.
| Parameter | Should Be Hashed | Quality Score Impact | Example (Before Hashing) | Example (After Hashing if Required) | Note |
|---|---|---|---|---|---|
| content_name | No | Medium | “Men’s Blue T-Shirt” | N/A | Not PII but helps with relevance |
| content_type | No | Medium | “product” | N/A | Not PII but improves categorization |
| content_category | No | Medium | “Apparel” | N/A | Not PII but enhances targeting |
| event_source_url | No | Medium | “https://example.com/product/123“ | N/A | Not PII but provides context |
The “Quality Score Impact” column reveals something crucial for marketers: certain parameters have a disproportionate impact on how effectively Facebook can match your customers and optimize your campaigns. Notice how parameters like
phone,external_id,value,currency, andorder_idall have “High” impact ratings. These are your golden data points – prioritize sending these correctly to dramatically improve your campaign performance.
- Overview of Facebook standard events
The following event lists are organized by taxonomy (Category). This makes it easier to map your site experience to Facebook’s standard events.
- E-commerce
| Event Name | Description | Use Case |
|---|---|---|
| ViewContent | When a user views a product or content page | Product detail pages, content articles |
| AddToCart | When a user adds items to their shopping cart | E-commerce shopping experience |
| InitiateCheckout | When a user starts the checkout process | Beginning of checkout flow |
| AddPaymentInfo | When a user adds payment information during checkout | Payment details entry step |
| Purchase | When a user completes a purchase transaction | Order confirmation page |
- Lead Generation
| Event Name | Description | Use Case |
|---|---|---|
| Lead | When a user expresses interest in a product or service | Form submissions, newsletter signups |
| Contact | When a user contacts your business | Contact form submissions, click-to-call |
- Registration
| Event Name | Description | Use Case |
|---|---|---|
| CompleteRegistration | When a user completes a registration form | Account creation, subscription sign-up |
- Service
| Event Name | Description | Use Case |
|---|---|---|
| Schedule | When a user schedules an appointment | Booking systems, appointment requests |
- Subscription
| Event Name | Description | Use Case |
|---|---|---|
| Subscribe | When a user subscribes to a service | Paid subscriptions, newsletter opt-ins |
- SaaS
| Event Name | Description | Use Case |
|---|---|---|
| StartTrial | When a user starts a free trial | SaaS free trial registrations |
- Other
| Event Name | Description | Use Case |
|---|---|---|
| SubmitApplication | When a user submits an application | Job applications, loan applications |
| Search | When a user performs a search on your site | Site search functionality |
Client-side configuration
We’ll start by creating a Google tag. You don’t need to add a real GA ID to it (it’s simply a bridge between browser and server). All the information we’ll send via the server will be fetched from a data layer variable. Below is an example of a view_item data layer event to track product impressions:
dataLayer.push({
  event: "view_item",
  user_data: {
    visitor_type: "logged_in",
    customer_email: "[email protected]", // Include only if available
    customer_first_name: "John",
    customer_last_name: "Smith",
    customer_phone: "+442071234567", // Include only if available
    customer_city: "London",
    customer_zip: "EC1A 1BB",
    customer_address_1: "45 Baker Street", // Include only if available
    customer_address_2: "Flat 3", // Include only if available
    customer_country: "GB",
    customer_country_code: "GB",
    user_id: "USER7890"
  },
  ecommerce: {
    currency: "GBP", // Currency code (ISO 4217)
    value: 49.99, // Total value of the viewed item
    items: [
      {
        item_id: "SKU456",
        item_name: "Organic Whey Protein Powder",
        affiliation: "Nutrition World",
        coupon: "HEALTH20",
        discount: 5.00,
        index: 0,
        item_brand: "Pure Nutrition",
        item_category: "Sports Nutrition",
        item_category2: "Protein",
        item_category3: "Whey",
        item_category4: "Organic",
        item_category5: "Unflavored",
        item_list_id: "protein_list",
        item_list_name: "Protein Products",
        item_variant: "500g",
        variant_id: "87654321098765",
        image: "https://example.com/images/products/organic-whey-protein.jpg",
        url: "https://example.com/products/organic-whey-protein",
        selling_plan_name: "subscription",
        location_id: "ChIJdd4hrwug2EcRmSrV3Vo6llI",
        price: 49.99,
        quantity: 1
      }
    ]
  }
});
Although the data layer looks quite dense, we are basically sending 2 important arrays: user_data and ecommerce. The user_data array contains customer information for identity matching, while the ecommerce array contains detailed product information including price, currency, and item metadata that Facebook needs for accurate conversion tracking and product catalog integration.
Accessing Data Layer Variables in GTM
Below are examples of how to create data layer variables in Google Tag Manager to access the information we’re sending through the data layer. These variables will be used in your server-side tracking configuration.
Example #1: Creating a Variable for User Email
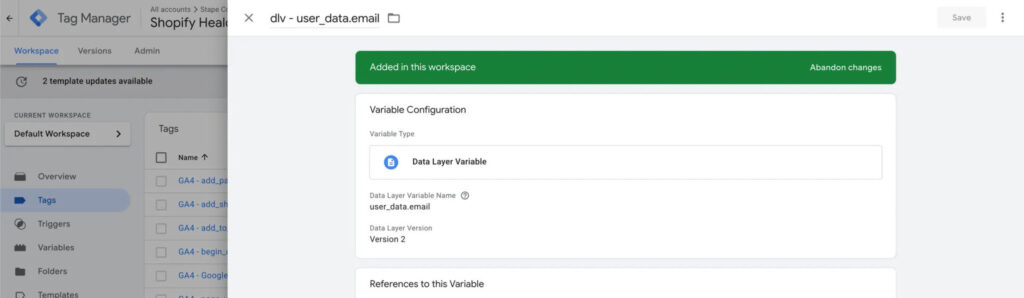
In GTM, create a Data Layer Variable to capture the user’s email:
- Name: dlv – user email
- Variable Type: Data Layer Variable
- Data Layer Variable Name:
user_data.customer_email
Example #2: Accessing Transaction Value

For capturing the total transaction value:
- Name: dlv – transaction value
- Variable Type: Data Layer Variable
- Data Layer Variable Name:
ecommerce.value
- Data Layer Version: Version 2
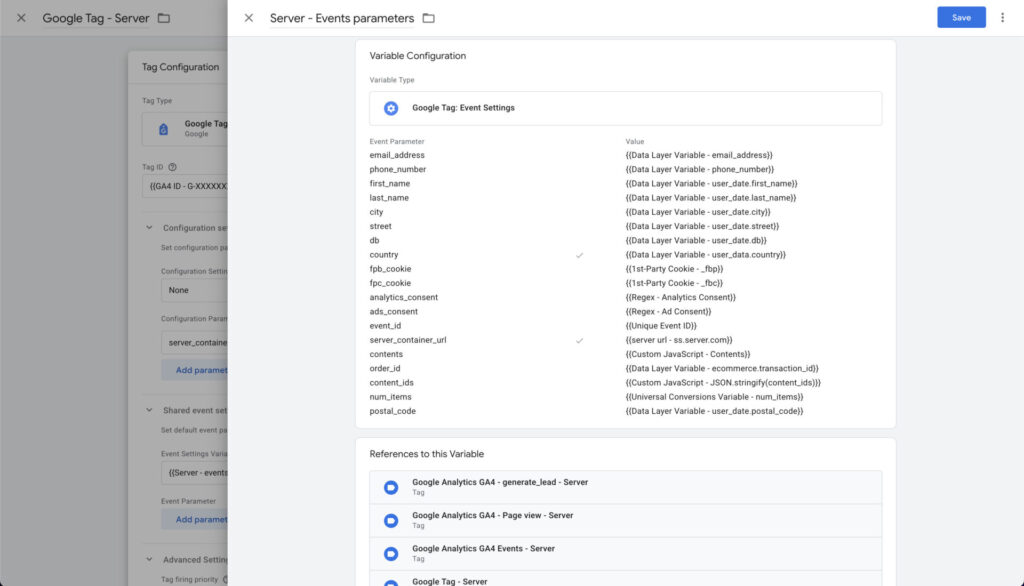
Next, we need to add any events we want to share with Facebook (and any platform) to the Events Settings section. All events using this variable have access to the same parameters.
Converting GA4 parameters Data to Facebook’s Format
We will prepare these parameters and use them in both client and server tags of facebook.
User Parameters for Facebook CAPI and Pixel Tracking
- User Identification: parameters help Facebook identify and match users across devices and sessions, which is crucial for accurate attribution and audience building.
| Parameter name | Description | Example | Required |
|---|---|---|---|
| em | email address | [email protected] | Optional |
| external_id | user_id from Data Layer | user_123456 | Optional |
| ph | phone number | +442071234567 | Optional |
- Personal Information: provide additional user context that can improve matching rates and audience quality when hashed and sent to Facebook.
| Parameter name | Description | Example | Required |
|---|---|---|---|
| fn | customer first name | John | Optional |
| ln | customer last name | Smith | Optional |
| customer_type | new or returning | returning | Optional |
- Location Parameters: Location data helps improve user matching and enables geographic targeting capabilities in your Facebook campaigns.
| Parameter name | Description | Example | Required |
|---|---|---|---|
| ct | customer city | London | Optional |
| st | customer state | Greater London | Optional |
| zp | customer postal code | EC1A 1BB | Optional |
| country | customer country code | GB | Optional |
- Transaction Parameters: These parameters track the financial aspects of conversions, allowing for accurate ROAS calculations and value optimization in your campaigns.
| Parameter name | Description | Example | Required |
|---|---|---|---|
| value | order values as defined by revenue, subtotal, or product subtotal | 49.99 | Required |
| currency | currency code | GBP | Required |
| order_id | order ID | ORD-12345-67890 | Required for purchase events |
- Product Parameters: Product data enables catalog synchronization, dynamic ads, and product-specific attribution in Facebook’s reporting.
| GA4 Parameter | Parameter name | Description | Example | Required |
|---|---|---|---|---|
| items | contents | an array of product data ex: [{“id”:”9005846987058″,”name”:”The Collection Snowboard: Liquid”,”content_category”:”snowboards”,”item_price”:”749.95″,”quantity”:”1″}] | [{“id”:”SKU456″,”name”:”Organic Whey Protein Powder”,”content_category”:”Sports Nutrition”,”item_price”:”49.99″,”quantity”:”1″}] | Required for product events |
| N/A | content_ids | product identifier selected, this could be product ID, SKU, or Variant ID | [“SKU456″,”SKU456”] | Required for product events |
| content_group | content_type | product group or product varies based on which product ID is used | product | – |
- Event Meta data: Meta data parameters help with event deduplication and proper event tracking across both client and server implementations.
| Parameter name | Description | Example | Required |
|---|---|---|---|
| eventID | unique ID per event, same is passed for the client-side and server-side version of the same event. This is used to deduplicate events in facebook | event_id_12345_1695115632 | Required |
When implementing both pixel and CAPI, ensure that the same
eventIDis used for both client and server versions of the same event to prevent duplicate reporting in Facebook Ads Manager.
Step 1: Mapping parameters
If you want to send ecommerce data to GA4, we typically use the items array. Facebook has a slightly different array structure where ecommerce data is stored in a contents array. There are multiple ways to convert these parameters, with the most basic approach being JavaScript to map the data to the right format.
Here’s an example of converting GA4 items to Facebook contents format using a javascript variable:
function() {
  var items = {{Data Layer Variable - ecommerce.items}};
  if (!Array.isArray(items)) return [];
  return items.map(function(item) {
    return {
      id: item.item_id,
      name: item.item_name,
      content_category: item.item_category,
      item_price: item.price,
      quantity: item.quantity
    };
  });
}
If you don’t want to use JavaScript, another alternative is to rely on Universal Conversions variable. How it works is fairly simple: you provide it with the items array, add the names of the parameters (e.g., item_name), and it will map this to Facebook’s format.

Step 2: adding facebook web tag
Although we can run a pure server-side implementation, Facebook still recommends using the pixel. This might change later on but for now let’s add our Facebook web tags. Here is an example of tracking Purchase event.
- Mapping data layer variables
We will use this data layer for purchase event. This data layer format provides all necessary information for Facebook’s Conversion API, including transaction details, product information, and user data. The structure maps cleanly to Facebook’s required parameters, with transaction values in the ecommerce object and customer information in the user_data object.
{
  "event": "purchase",
  "ecomm_pagetype": "purchase",
  "ecommerce": {
    "transaction_id": "71",
    "affiliation": "Online Academy",
    "value": "160.00",
    "tax": "0.00",
    "shipping": "0.00",
    "currency": "USD",
    "coupon": "SAVE20",
    "discount_amount": "40.00",
    "items": [
      {
        "item_name": "GTM - course",
        "item_brand": "Analygo",
        "item_id": "67",
        "item_sku": "GTM-COURSE-67",
        "price": "100.00",
        "imageUrl": "https://example.com/images/gtm-course.jpg",
        "item_category": "Analytics",
        "discount": "20.00",
        "quantity": 1,
        "index": 1
      },
      {
        "item_name": "GA4 - course",
        "item_brand": "Analygo",
        "item_id": "68",
        "item_sku": "GA4-COURSE-68",
        "price": "100.00",
        "imageUrl": "https://example.com/images/ga4-course.jpg",
        "item_category": "Tracking",
        "discount": "20.00",
        "quantity": 1,
        "index": 2
      }
    ]
  },
  "user_data": {
    "customer_id": "CUST-00071",
    "billing_first_name": "Alex",
    "billing_last_name": "Morgan",
    "billing_address": "123 Elm Street, Apt 4B",
    "billing_postcode": "10001",
    "billing_country": "US",
    "billing_state": "NY",
    "billing_city": "New York",
    "billing_email": "[email protected]",
    "billing_phone": "+1-212-555-0183",
    "shipping_first_name": "Alex",
    "shipping_last_name": "Morgan",
    "shipping_address": "123 Elm Street, Apt 4B",
    "shipping_postcode": "10001",
    "shipping_country": "US",
    "shipping_state": "NY",
    "shipping_city": "New York",
    "shipping_phone": "+1-212-555-0183",
    "email": "[email protected]",
    "new_customer": "true"
  },
  "gtm.uniqueEventId": 7
}
All we have to do is to map these values using the documentation. Let’s start by adding the web Facebook tag along with other all relevant fields.
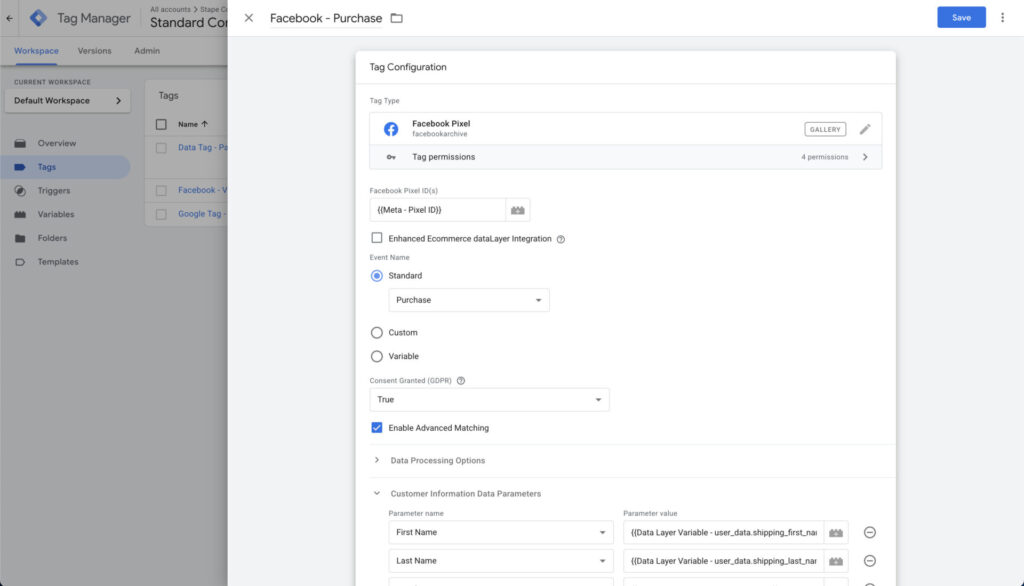
- Customer information data parameters
We can add customer data parameters on the client side as well. These will be hashed and used for advanced matching later on.

- Item-level data

Alternatively, you can use a variable like items and let the Facebook server tag handle the rest, but we prefer to control what data is passed and how (adding our custom logic).
For the custom parameters section, we need to map the item-level data from our data layer to Facebook’s expected format. This includes:
- contents: An array containing detailed product information that Facebook uses for product-specific attribution
- content_ids: The unique identifiers for the products in the purchase
- content_type: Specifies whether we’re passing individual products or product groups
Step 3: Adding parameters to Google tag
We will use a dummy ID and save it as constant to be used when creating the event tag like below. We can use an actual ID once the data is shipped to our server.
The {{Server - Events parameters}} will hold all information we will use at the event level. If you want to include any parameter, it should be explicitly added to this variable or as an event-level parameter if you don’t want this to be available for other events.
Creating the first event and sending data to the server
We will create another web tag that carries information about when a user views items. Create a new tag and set the event name to view_item.
Finally, let’s create our web tag event. We will use. purchase event for this example.
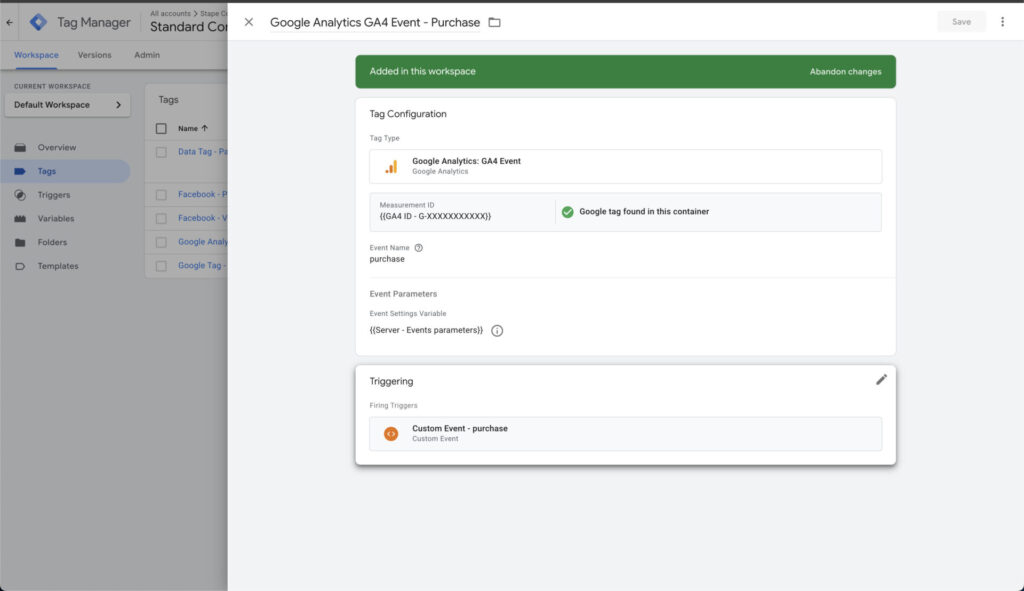
Since we created a shared events setting earlier, we won’t need to add parameters such as server URL for each individual tag. All parameters we need will be available by default as long as we don’t forget to add the event settings variable.
Server-side configuration
Now that we are passing the parameters from the client side, the only thing we need to do is to:
- Capture the payloads using the GA4 client
- Add the parameters to the Facebook server tags and retrieve the Facebook token from Facebook
- Make sure we are compliant by blocking tags in case users do not want to be tracked
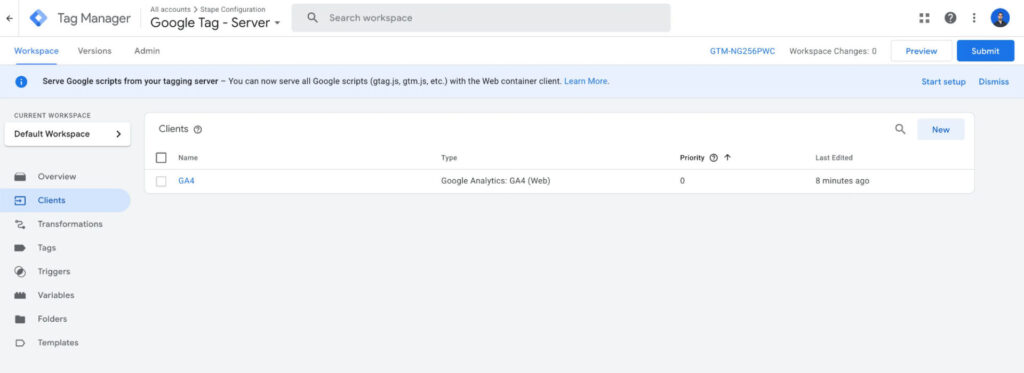
GA4 Client
Make sure you have a GA4 client in the client section. This client is typically included by default when you create a new server container.
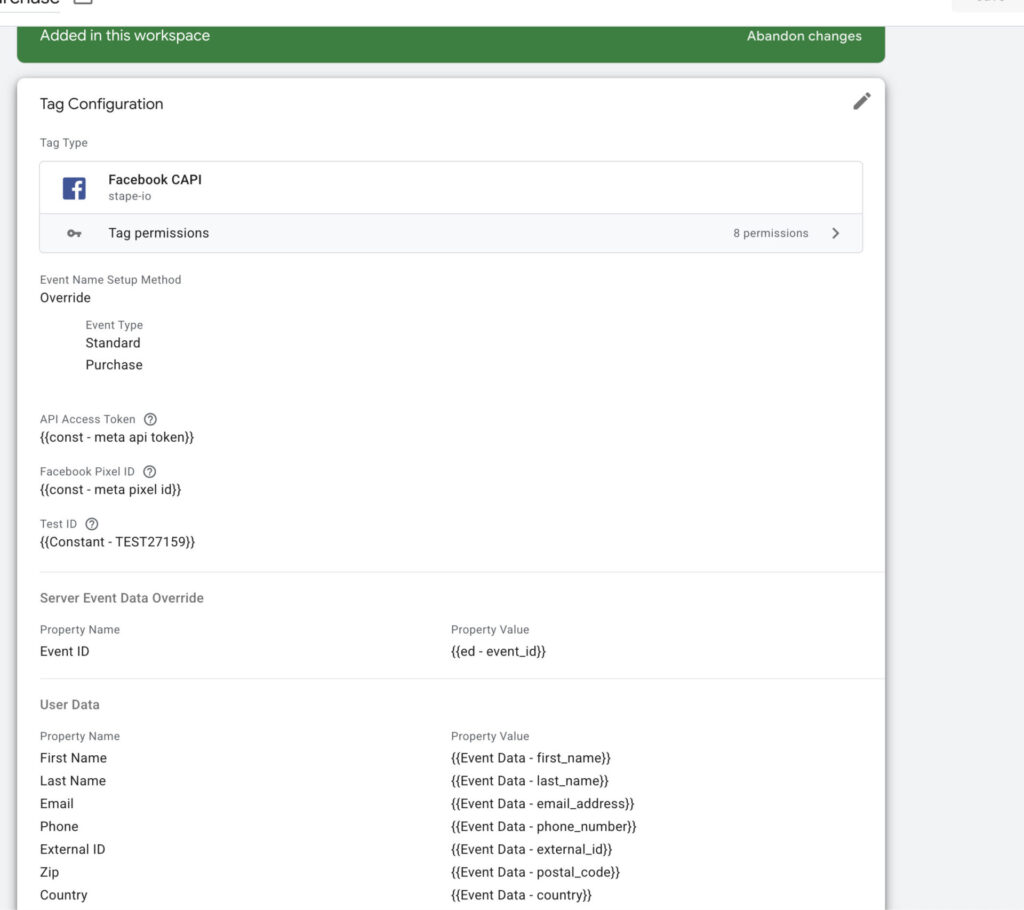
Facebook Server-side tag
First, make sure you have the GA4 client in the GTM server container client section. It will be responsible for intercepting events coming from the browser.
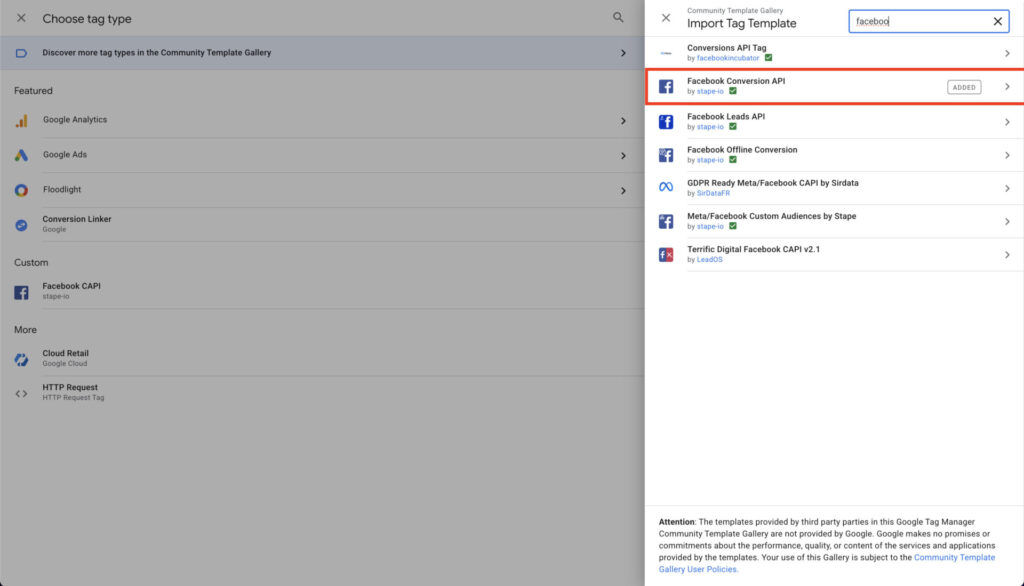
Next, navigate to the tags section and search for “facebook” in the tags templates library. You will find a Facebook template by Stape that we’ll be using.
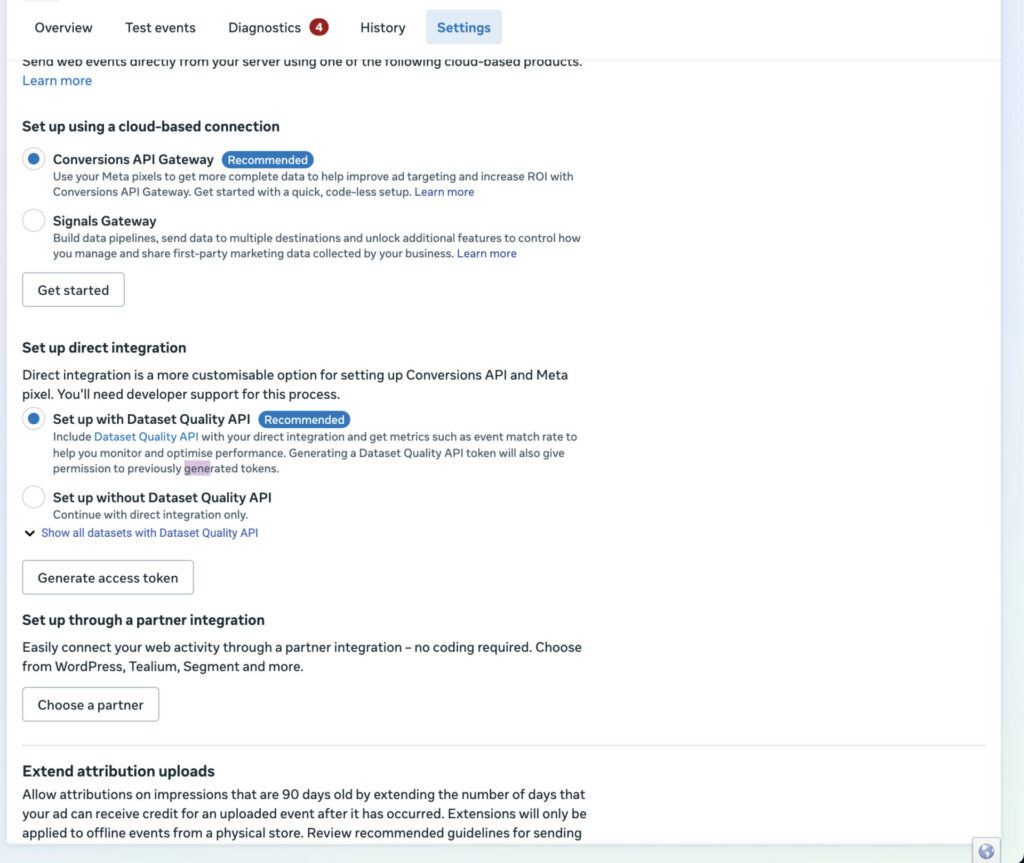
Add the pixel ID and generate a token by heading to the settings section in Meta’s business manger Click on Generate Access Token and copy as a constant.
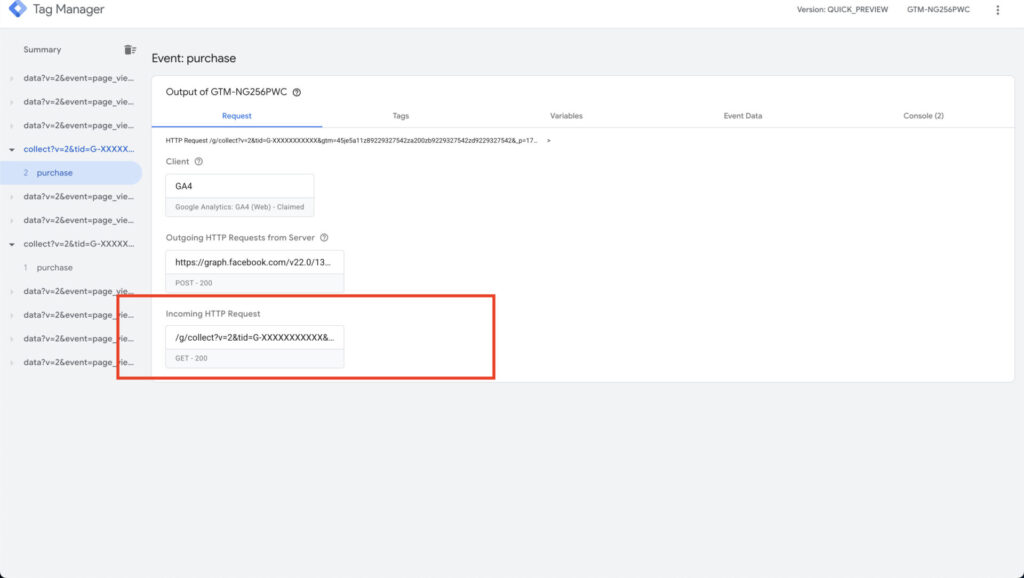
Getting event data from GA4 request
Similarly to the Web tag we will add the parameters: contents , content_ids , etc
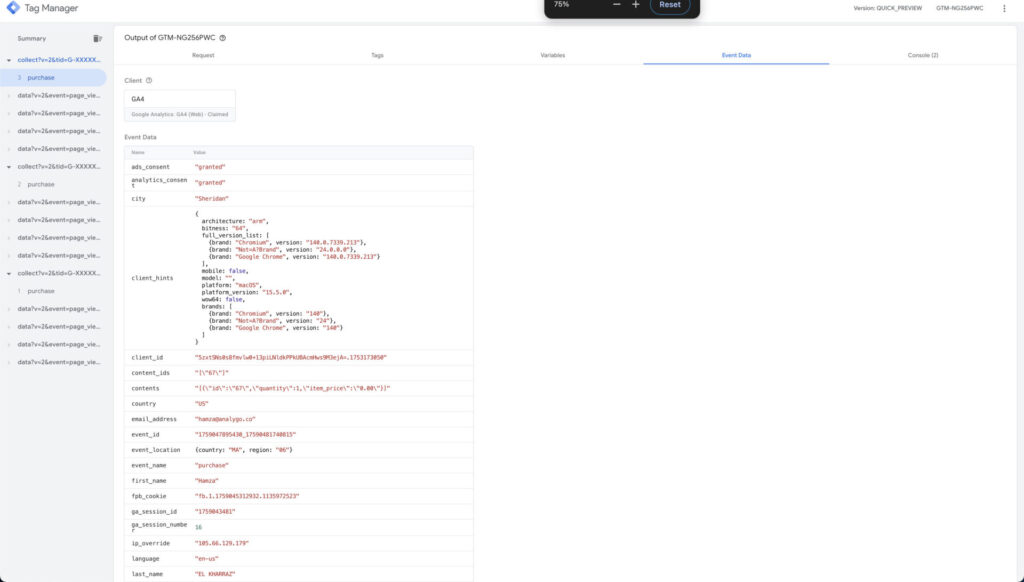
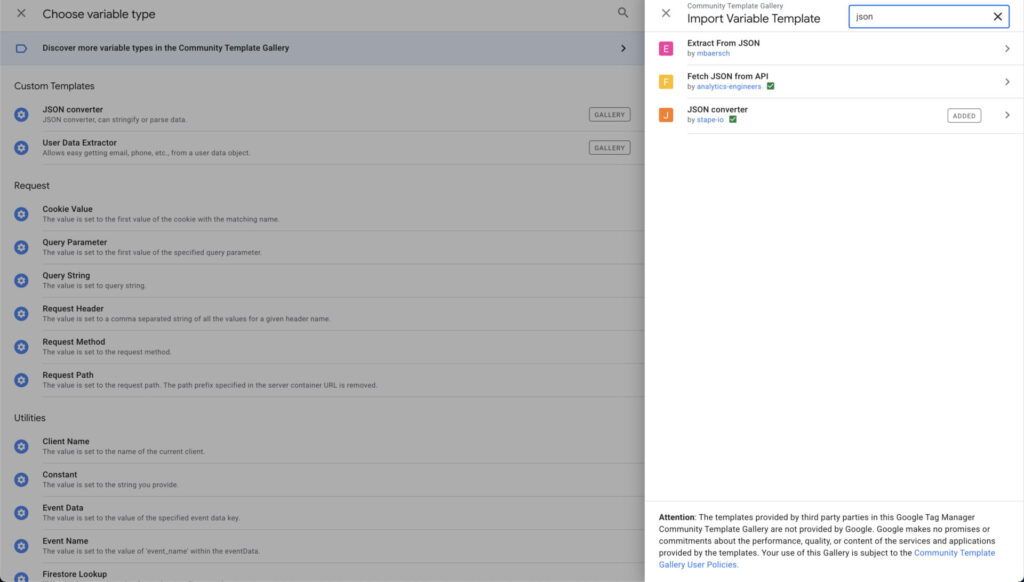
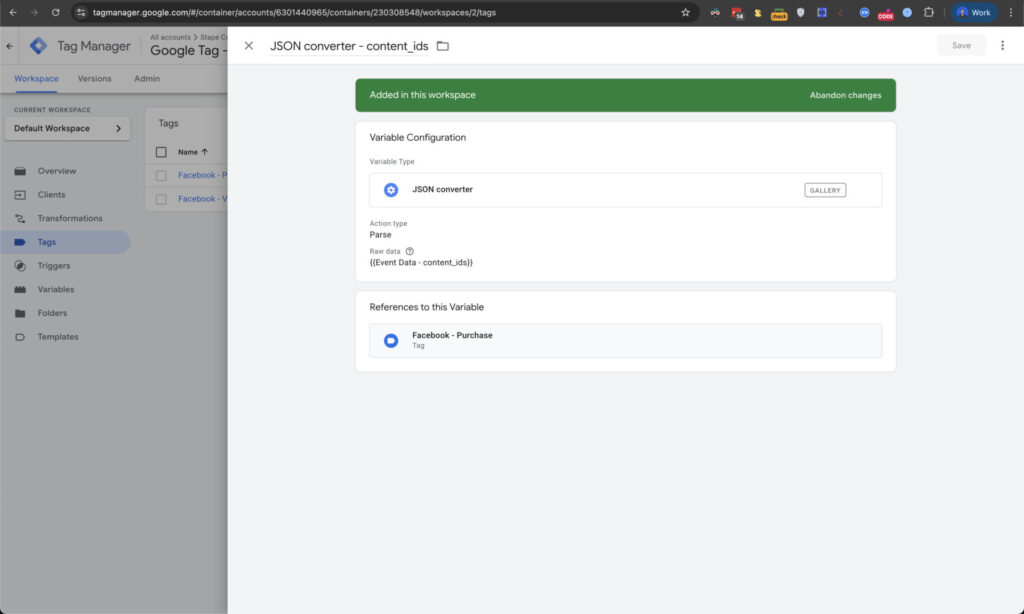
This is an example of how to fetch the contents parameter. You can repeat this process as many times as needed to retrieve all parameters you need. This can be done using a server-side template like the Json converter one by Stape.
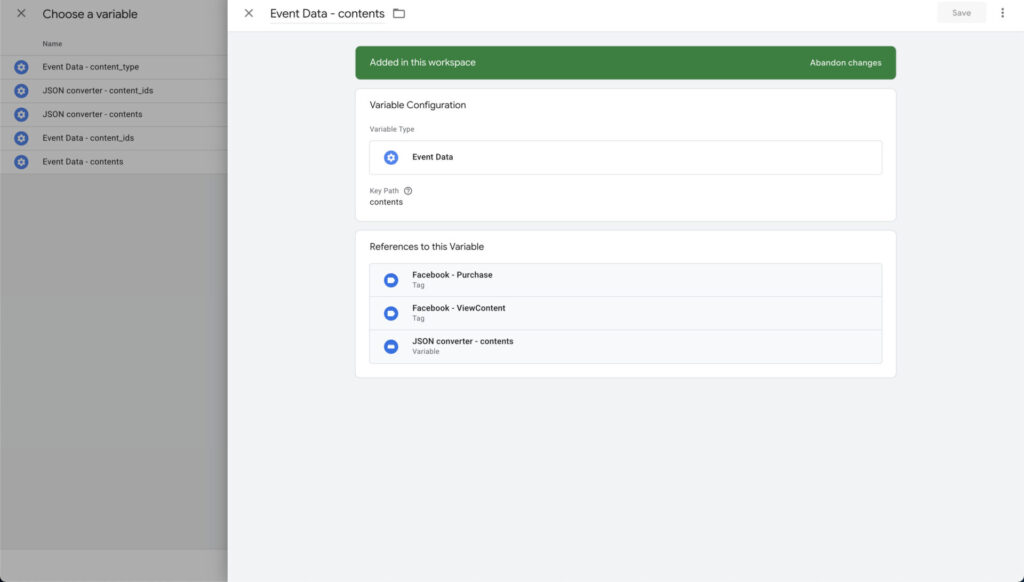
You only need to include the variable you want to turn from string to json and the template will handle the rest.
Adding parameters to the Facebook server-side tag
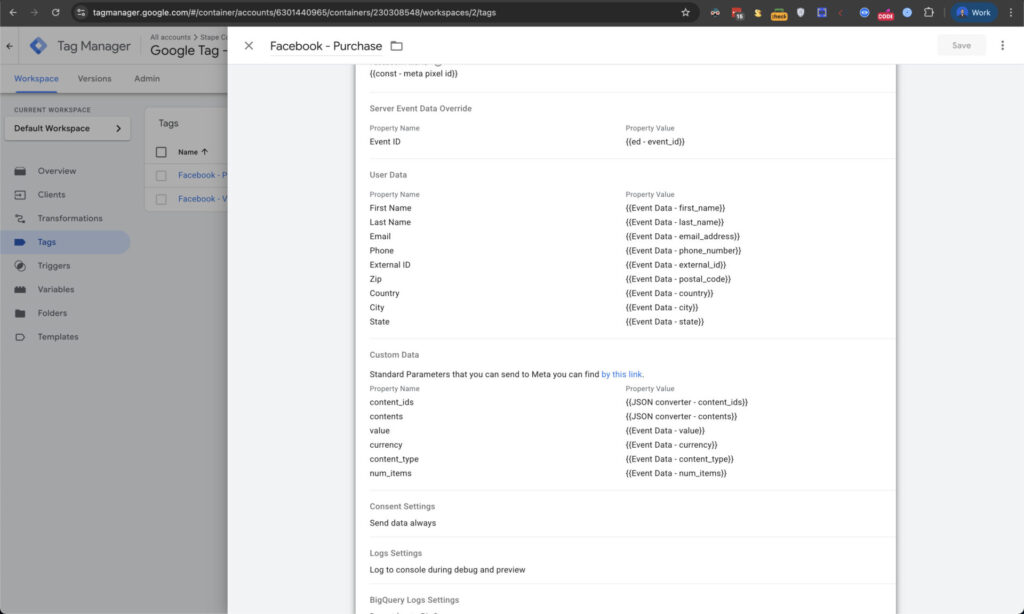
Now that we have fetched parameters from the event data, we only need to include them in the Facebook server tag. Similarly to the purchase event on the browser side, we will use a purchase tag for the server part.
We will add the event ID in the server event data override section. This will help us with deduplicating data we send from the browser. In the User Data section, we will add the user’s personal information using the same event data variable we used for other variables.
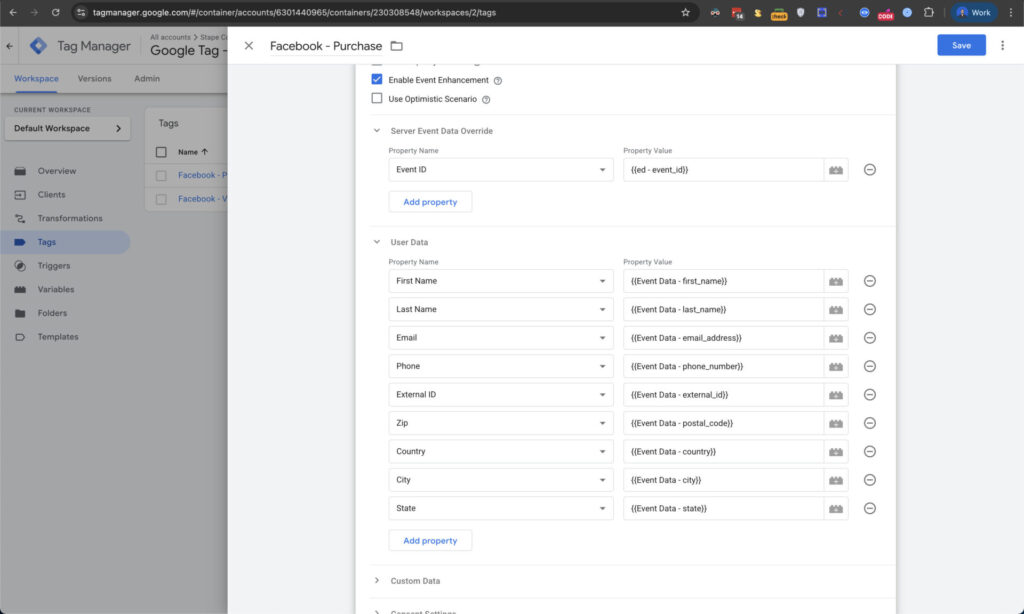
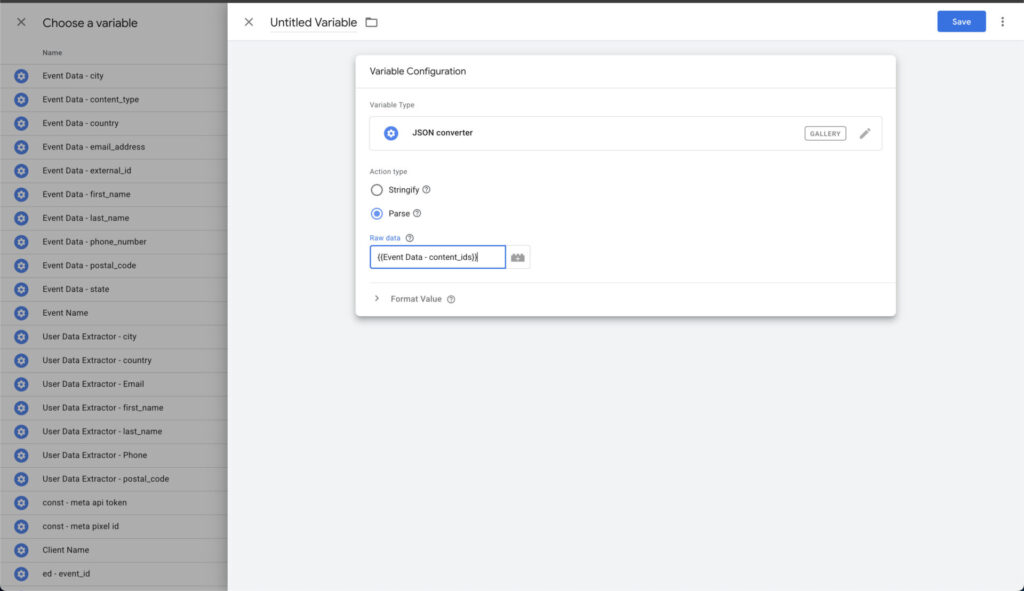
Next we will add the ecommerce data in the custom data section. First we need to turn variables like contents and content_ids to json format.
We will use a template by Stape called JSON converter. It will parse the string and convert it back to JSON format.
Once you do this for contents as well, you can start addding them to the server tag.
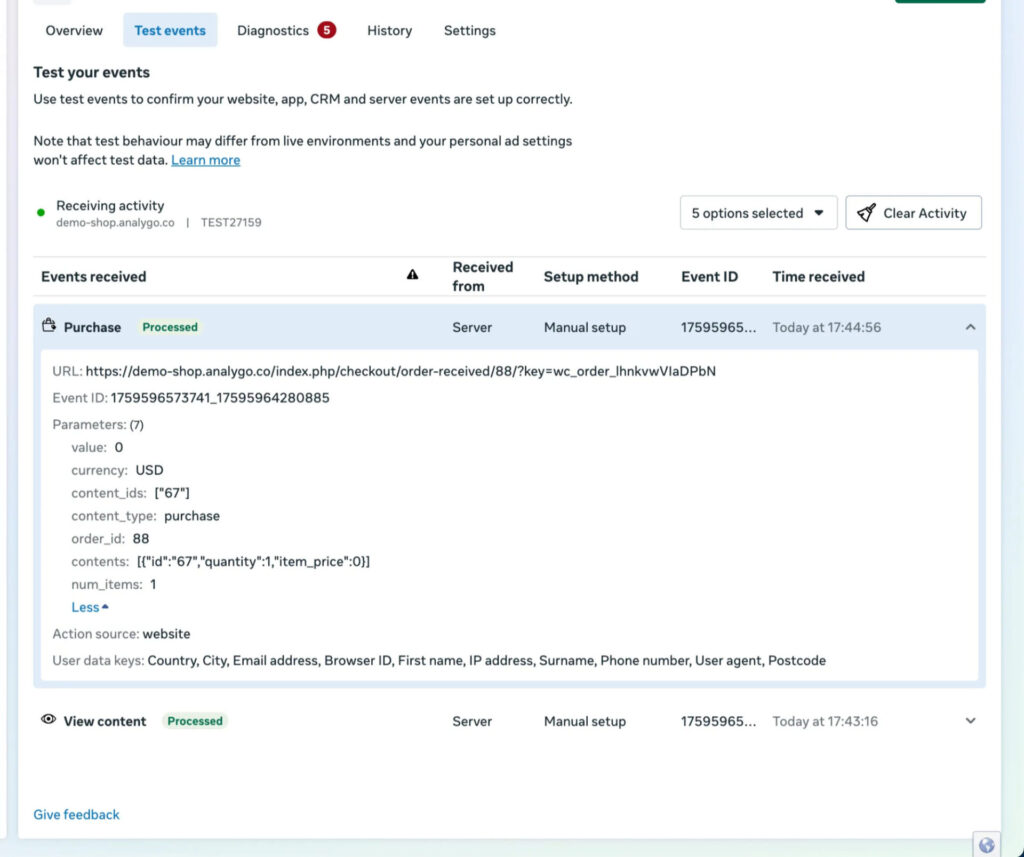
Testing server configuration
Finally, let’s test our configuration. I will get a test code from Facebook Events Manager to help us debug what parameters are passing correctly. All you need to do is get the test code from Meta’s Events Manager and then paste it in the testId section.
We will open preview mode in both server and browser GMT after adding test code, and then make a purchase.
Bonus: Consent mode configuration for facebook
Your tags should fire only if users consent to being tracked. A proper consent management platform will send consent signals we can utilize to either block or let facebook collect data freely.
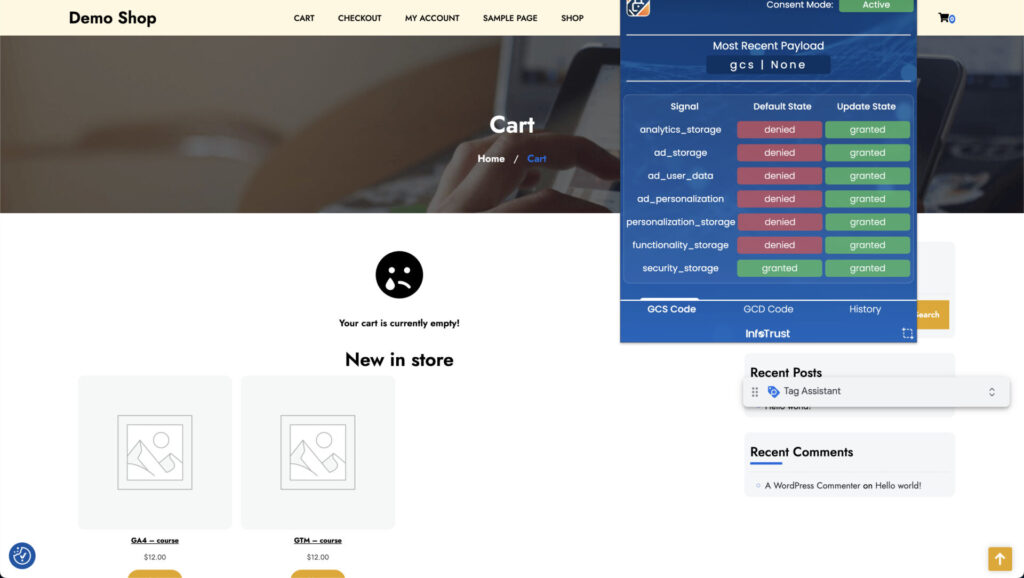
When you use a google tag and it’s sending data to the server container, the consent parameters are sent along the rest of the payload, if consent is granted, you will find that there is a gcs=111 parameter in request header.
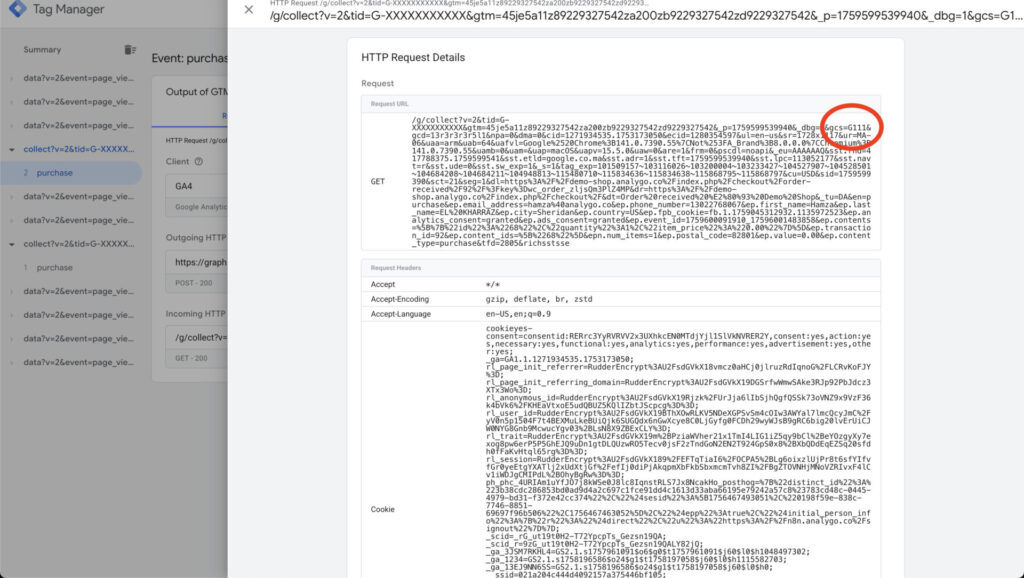
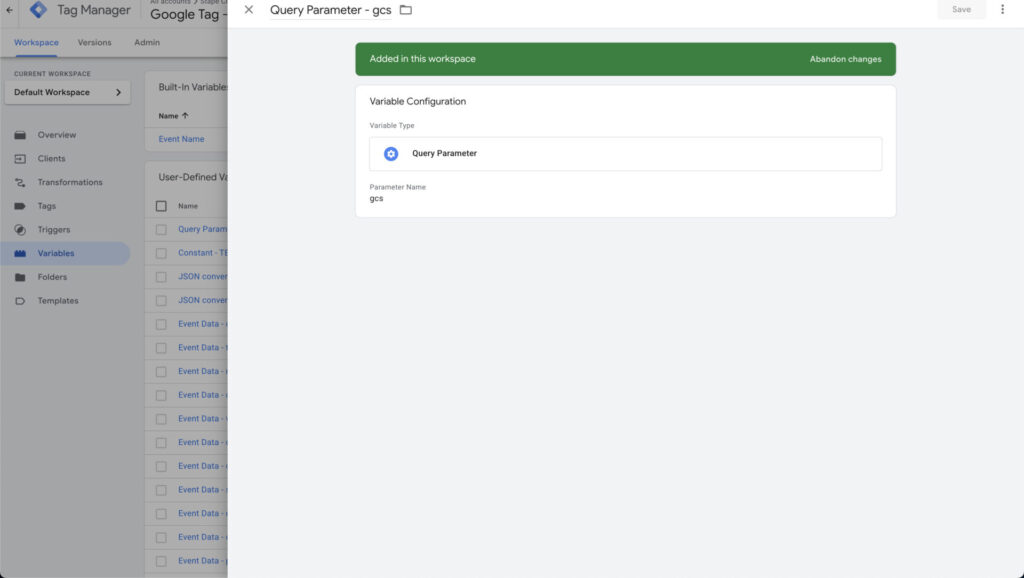
Now all you need to do is capture this information and turn it into an actual usable variable we can use to block tags. We use a variable called Query Parameter that will fetch a parameter like gcs containing consent states.
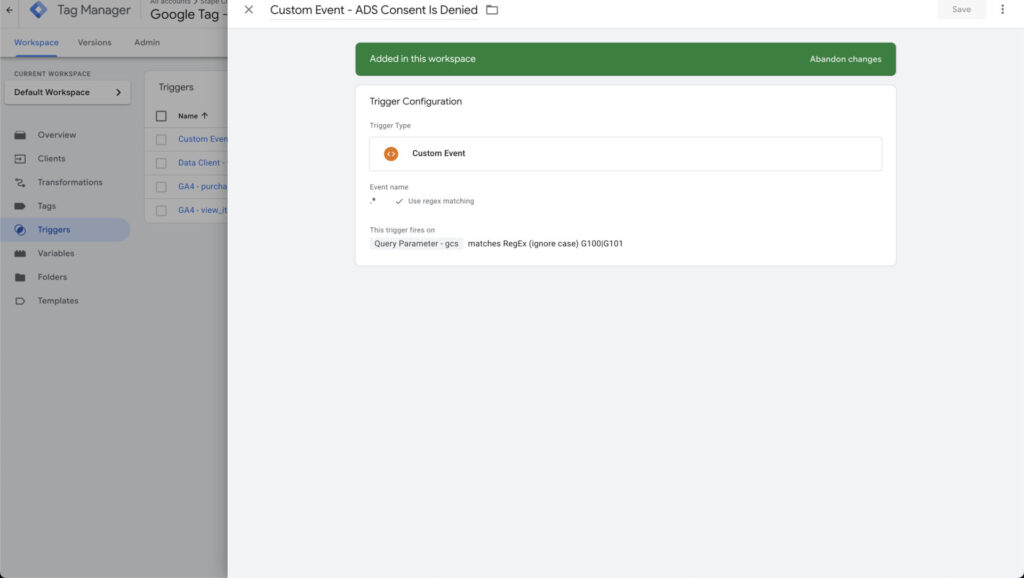
the next step is to use this variable in a regex table
Debugging Consent Mode Implementation
When Consent Mode is active, either in Basic or Advanced Mode, there are additional parameters sent with each analytics and advertising request to Google’s services.
For the original version of consent mode, if you’re looking at the network requests, the parameter you’re looking for is called &gcs, and it has a value in the following format: G1xy.
x stands for consent to Google Ads cookies and is either 1 (granted) or 0 (denied).
y stands for consent to Google Analytics cookies and is either 1 (granted) or 0 (denied).
Possible values are thus:
| Value | Google Ads | Google Analytics | Description |
|---|---|---|---|
G100 | No | No | No consent has been granted. |
G110 | Yes | No | Google Ads has consent, Google Analytics does not. |
G101 | No | Yes | Google Analytics has consent, Google Ads does not. |
G111 | Yes | Yes | Both Google Ads and Google Analytics have consent. |
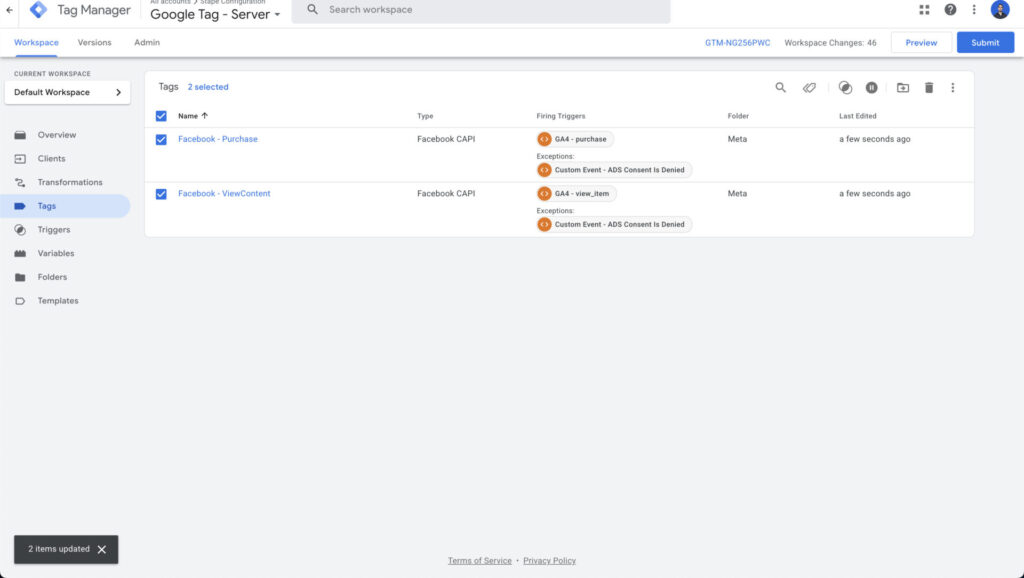
Based on this information, we will create a new event trigger. If we have G100 or G101, we will block our tag.
Now if we return to our site and deny cookies, preview mode will show that no tags were fired.

FAQs
Facebook Conversion API (CAPI) is a server-side solution that allows businesses to share web and offline events directly from their server to Facebook. This provides more reliable data tracking compared to client-side methods alone, especially with increasing privacy restrictions.
While Facebook Pixel operates in the browser (client-side), Conversion API works server-to-server. The key benefit is that CAPI isn’t affected by ad blockers or browser restrictions, creating a more reliable tracking system that complements your existing Pixel implementation.
You should implement CAPI if you’re experiencing data loss from pixel-based tracking, handle sensitive conversion events, need reliable tracking amid privacy restrictions, track offline conversions, or operate in a regulated industry with tracking limitations.
Server-side Google Tag Manager (sGTM) is most efficient as it captures browser events, processes them server-side, sends them to Facebook, maintains consistent consent rules, and reuses your existing GA4 event structure.
Include parameters such as contents, content_ids, content_name, content_type, currency, value, event_id (for deduplication), and user data (when available and consented) to align with Facebook Pixel tracking.
Capture consent signals from the client, create variables for consent states (like the gcs parameter), set up triggers to block tags without proper consent, apply consistent rules on both client and server sides, and document your consent handling process.
Use preview mode in both client and server GTM containers, utilize test codes from Facebook Events Manager, verify formatting for parameters, check event_id consistency across implementations, and confirm proper consent parameters are passed.
To avoid duplicates, use the same event_id in both Pixel and CAPI implementations—Facebook will automatically deduplicate matching event_ids. Regularly check Events Manager for duplicate reports.
Focus on high-value conversion events, implement proper deduplication using event_ids, ensure privacy compliance with consent management, use server-side GTM for efficient management, test thoroughly, document your setup, and monitor conversion discrepancies regularly.
Yes, Facebook recommends using both Pixel and CAPI together for optimal results. However, a 100% server-side setup using only CAPI is possible in highly regulated environments, though it sacrifices some browser-specific data.