Consent Mode v2: Overview With Examples
Businesses need to obtain accurate data while respecting users’ privacy. Google Consent Mode v2 is one of the ways Google attempts to achieve this goal.
At least for now, this is only limited to Google Ads. If you linked Google Ads to GA4, you will need to configure it for GA4 as well.
How Does Consent Mode work?
Section titled “How Does Consent Mode work?”The idea behind this technology is to keep track of users, even when consent is not granted. Is this GDPR-friendly? We will give our take later on this.
Google’s servers receive data of users who didn’t consent for data modeling. The goal is to guess how many conversions happened in total. Without Consent Mode, you won’t see conversions of people who deny tracking.
In order for this to work, you need two things:
A Consent Management Platform (CMP)
Section titled “A Consent Management Platform (CMP)”The main role of CMP is to manage users’ privacy choices. Another role is to share these choices with Google Tag Manager. This will determine how much information we can share with Google Ads, for example.
Enable Consent Overview in Google Tag Manager
Section titled “Enable Consent Overview in Google Tag Manager”This feature controls how your tags will behave in the presence/absence of consent. Once a CMP sends the signal, GTM will use it to determine how to execute each tag.
2 Types of Consent Mode
Section titled “2 Types of Consent Mode”Advanced Consent Mode
Section titled “Advanced Consent Mode”Advanced consent mode is when you send data to Google even when the user denies tracking. The data is anonymous with no identifiers. The purpose of collecting it is to compare it with what people who accepted cookies. This comparison will help Google estimate the ‘real’ number of conversions and traffic.
Basic Consent Mode
Section titled “Basic Consent Mode”Advanced consent mode might not be a good approach from a privacy point of view. This is especially true if you operate in the EU region. You might want to configure basic consent mode in this case.
The basic version of consent mode doesn’t send any kind of data to Google. You can think of it as the more strict version.
The role of a consent management platform (CMP)
Section titled “The role of a consent management platform (CMP)”Display cookie banner
Section titled “Display cookie banner”A CMP will display a cookie banner when a new user visits your website.

Send consent signal to Google Tag Manager
Section titled “Send consent signal to Google Tag Manager”Once the user makes his choice, GTM receives a signal with the user’s choice. GTM will use it to determine how a tag will execute.
Assuming the user denies any kind of tracking, the signal will look like this:
ad_personalization: "denied"ad_storage: "denied"ad_user_data: "denied"analytics_storage: "denied"functionality_storage: "denied"personalization_storage: "denied"security_storage: "granted"For the EU region, the default settings are set to “denied” by default. The only exception is the functionality storage. These types of cookies are necessary for your website to function.
Consent Mode v2: What Has Changed?
Section titled “Consent Mode v2: What Has Changed?”We have new parameters in the updated version: ad_personalization and ad_user_data. The new parameters are Google’s reaction to evolving regulations like GDPR.
ad_personalization
Section titled “ad_personalization”Google Ads uses this signal to display ads adapted to your browsing history.
ad_user_data
Section titled “ad_user_data”As the name suggests, GTM sends the user’s personal data to Google Ads.
How to Switch to Consent Mode v2?
Section titled “How to Switch to Consent Mode v2?”To update your set, you only need to add the new parameters we talked about. The method you will use depends on whether you are using a GTM template or you added the CMP script to the website.
You Are Using Google Tag Manager Template
Section titled “You Are Using Google Tag Manager Template”In this case, you need to enable ad_user_data and ad_personalization in GTM template. Here is an example with the CMP CookieYes.
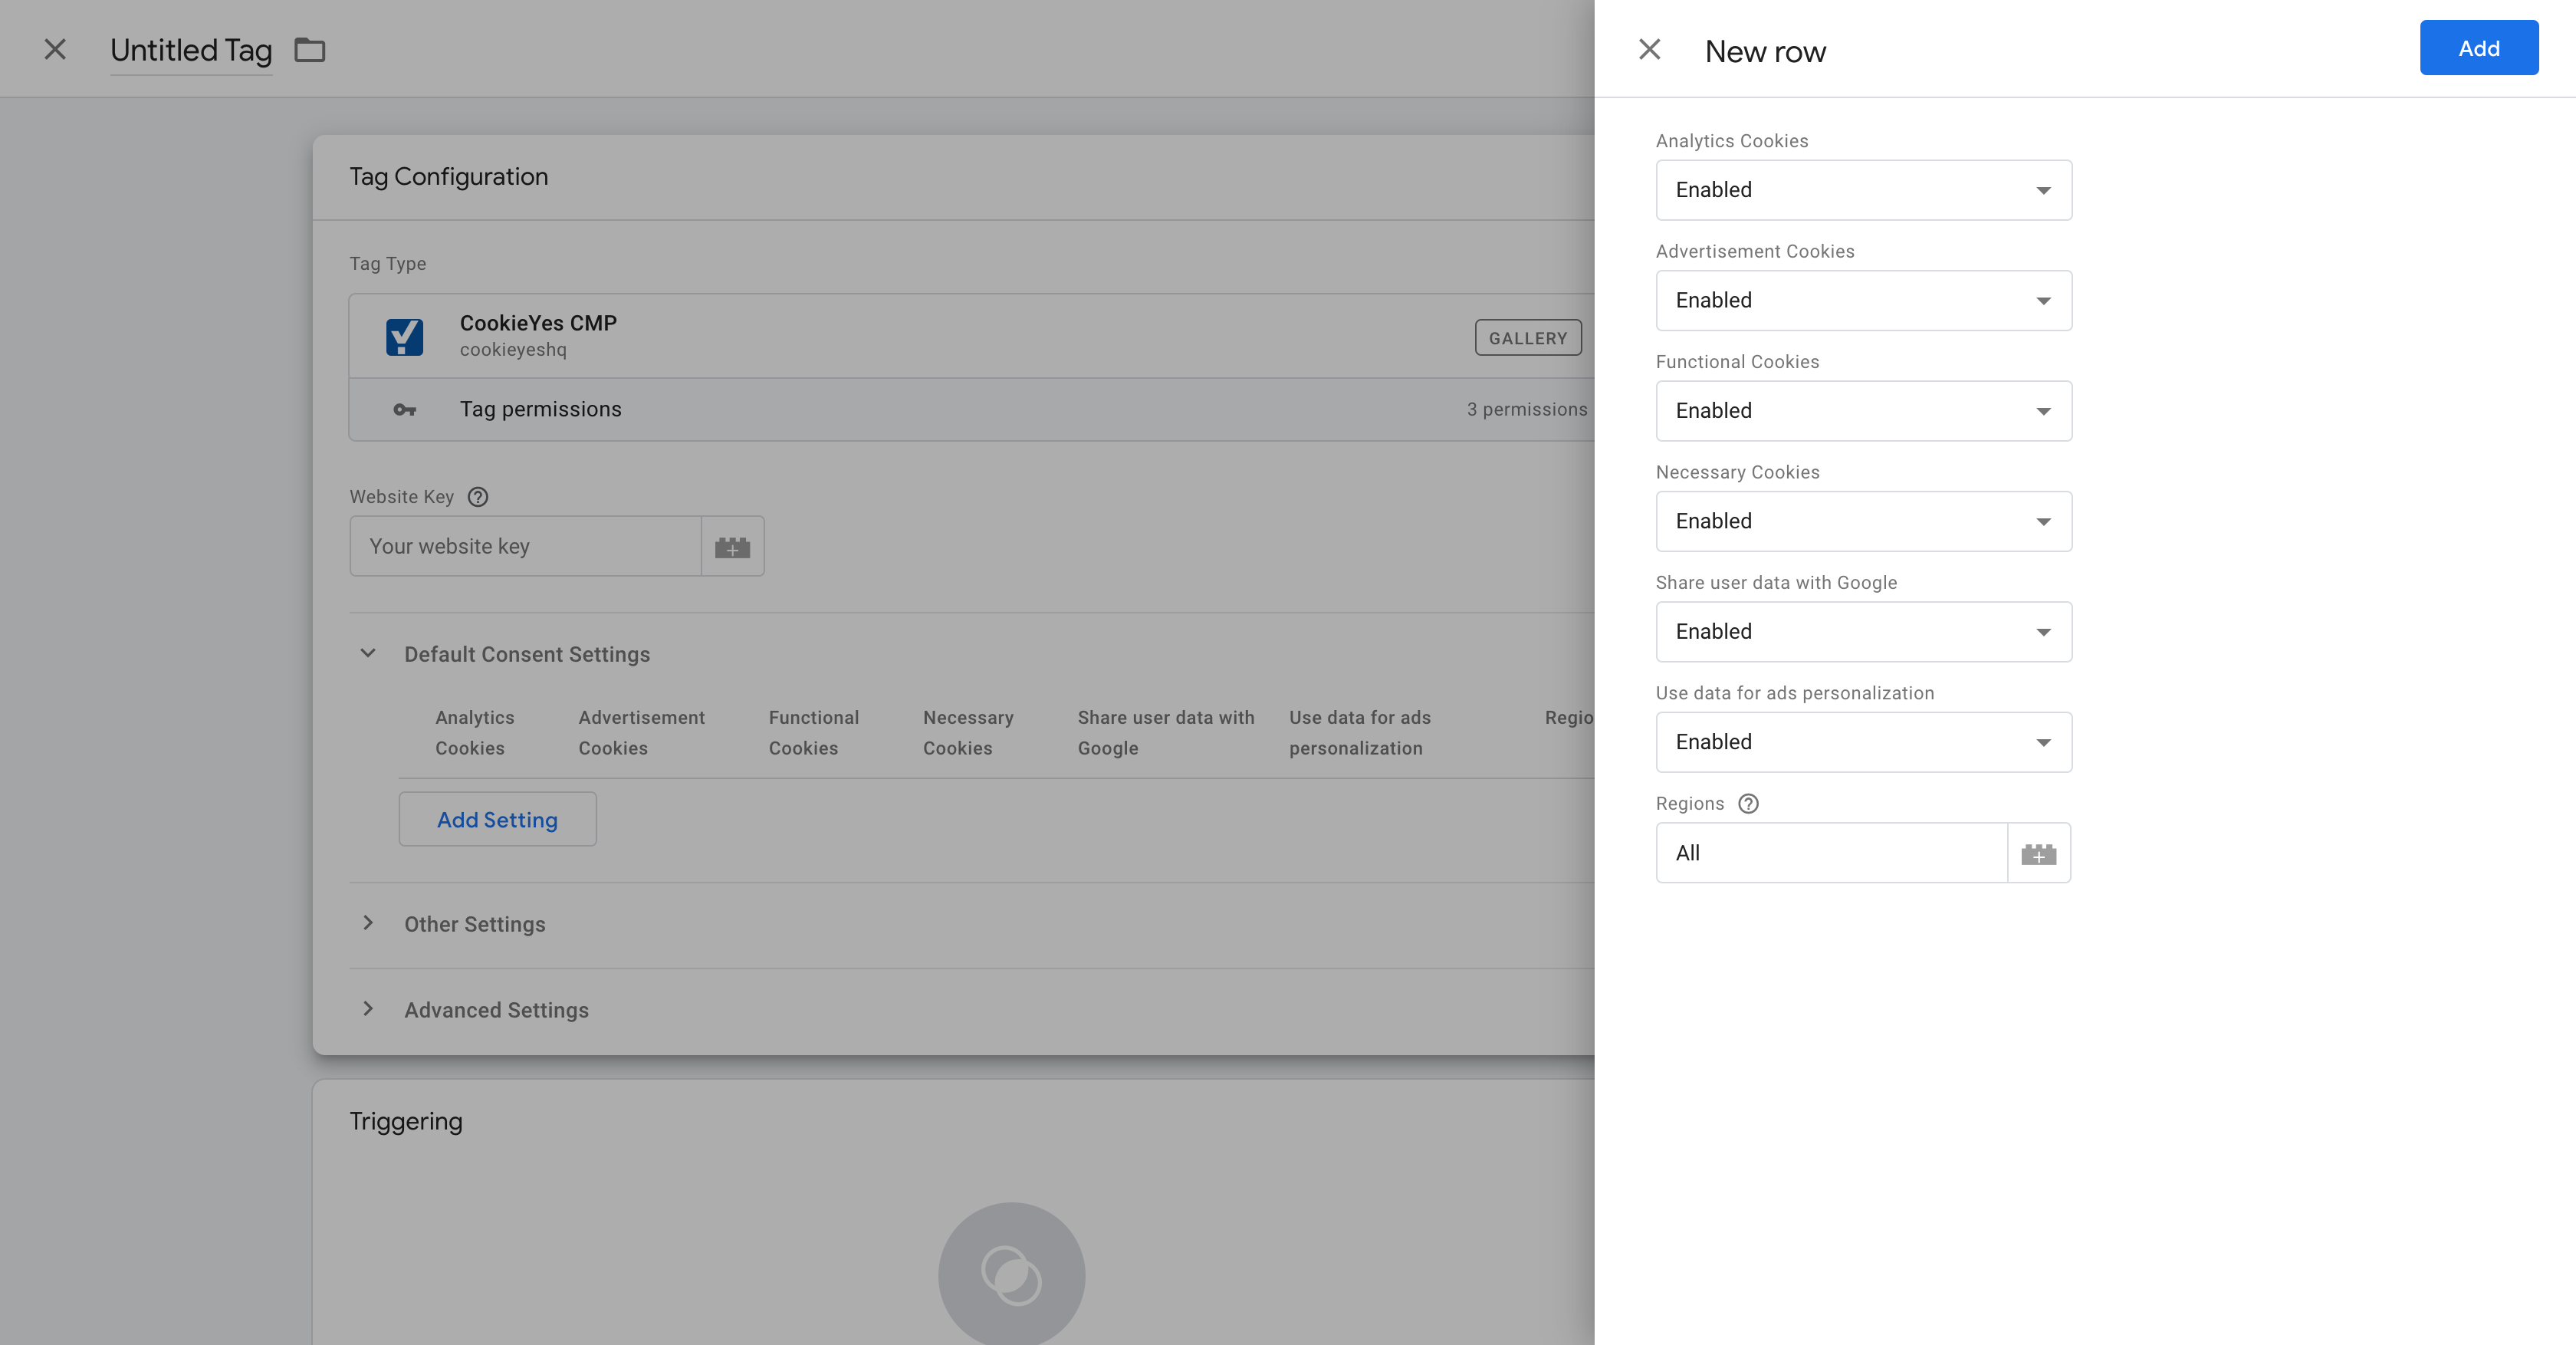
As you can see, we have all the parameters we discussed earlier.
If your CMP doesn’t display the new parameters, try deleting it and adding it again to your GTM library.
You Added the CMP Script to Your Website
Section titled “You Added the CMP Script to Your Website”In this case, you need to add the two lines of code for each parameter. Your final script will look like this:
<script>    window.dataLayer = window.dataLayer || [];
    function gtag() {        dataLayer.push(arguments);    }
    gtag("consent", "default", {        ad_storage: "denied",        ad_user_data: "denied",        ad_personalization: "denied",        analytics_storage: "denied",        functionality_storage: "denied",        personalization_storage: "denied",        security_storage: "granted",        wait_for_update: 2000,    });
    gtag("set", "ads_data_redaction", true);    gtag("set", "url_passthrough", true);</script>
Example: Integrating Consent Mode with CookieYes CMP
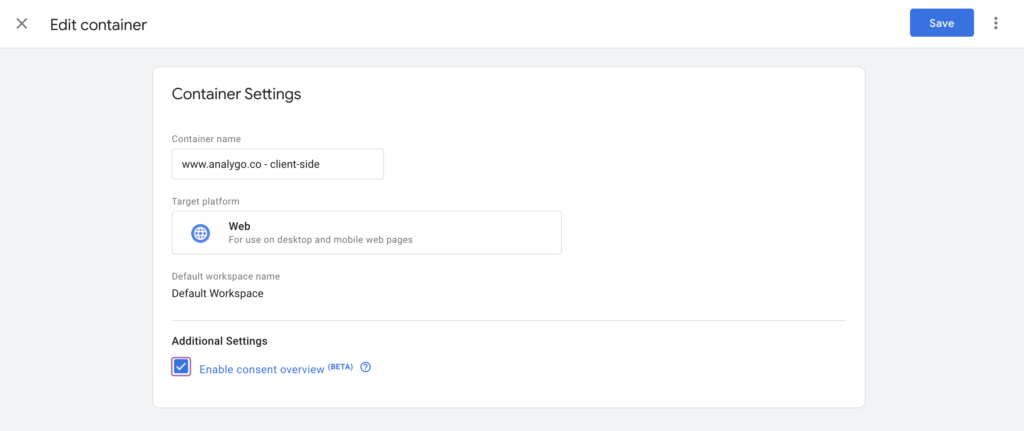
Section titled “Example: Integrating Consent Mode with CookieYes CMP”Enable Consent Overview in Google Tag Manager (GTM)
Section titled “Enable Consent Overview in Google Tag Manager (GTM)”Consent overview makes managing consent settings of tags much easier.
To enable consent settings:
Go to GTM container > Admin > Container settings > Enable consent overview.
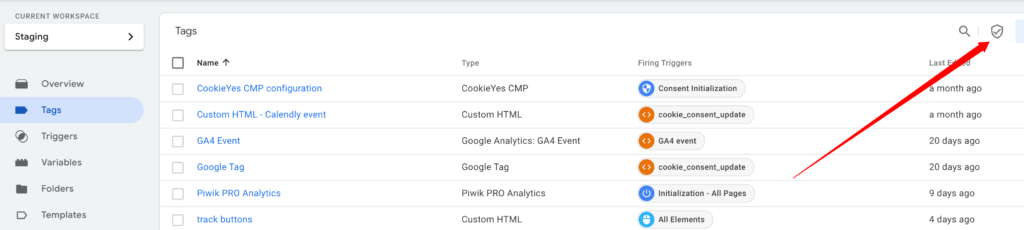
You can manage all the tags consent settings by clicking on the icon:
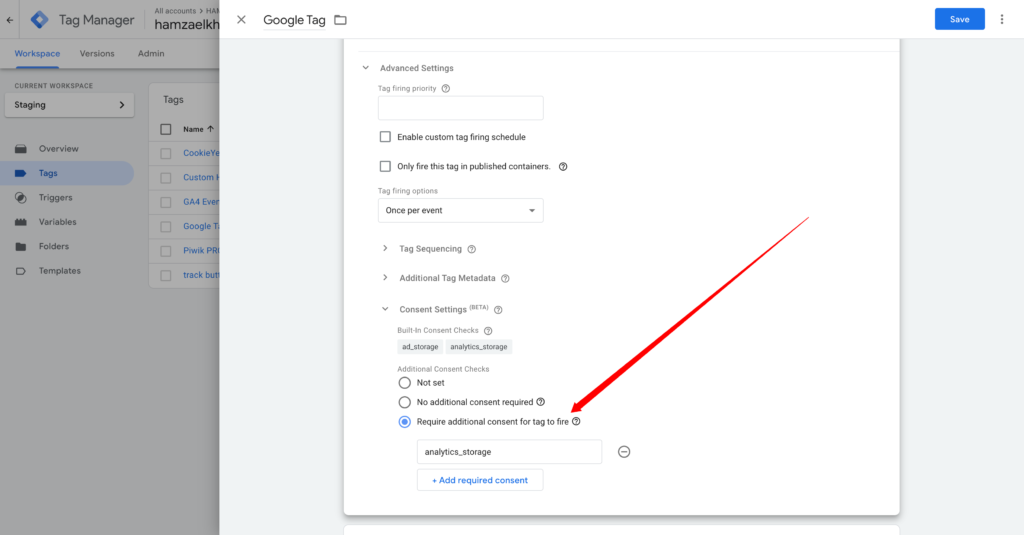
Tag Configuration Using Advanced Consent Mode
Section titled “Tag Configuration Using Advanced Consent Mode”Advanced consent mode sends data to Google even when a user denies tracking. To configure it, check the option “No additional consent required.”
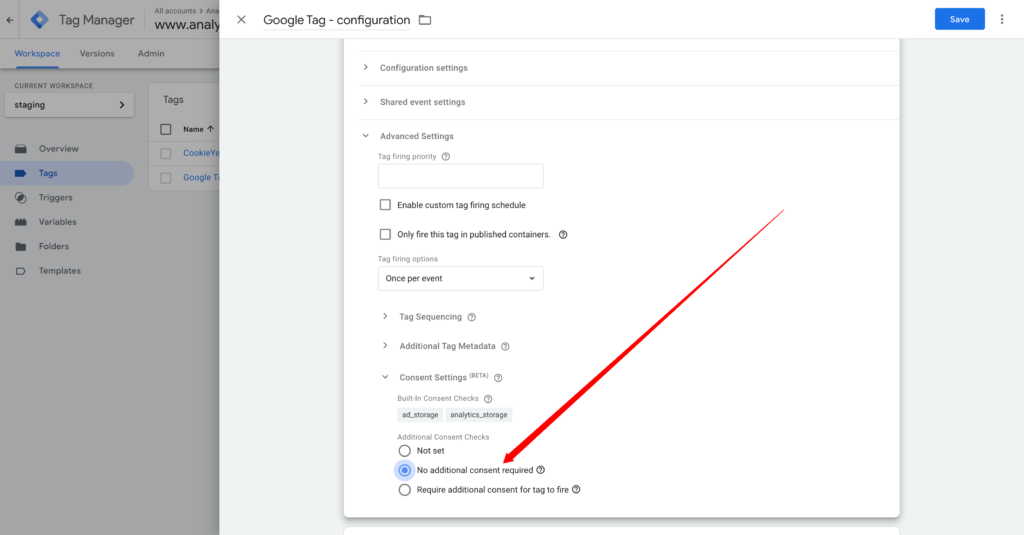
That’s all you have to do for the advanced version.
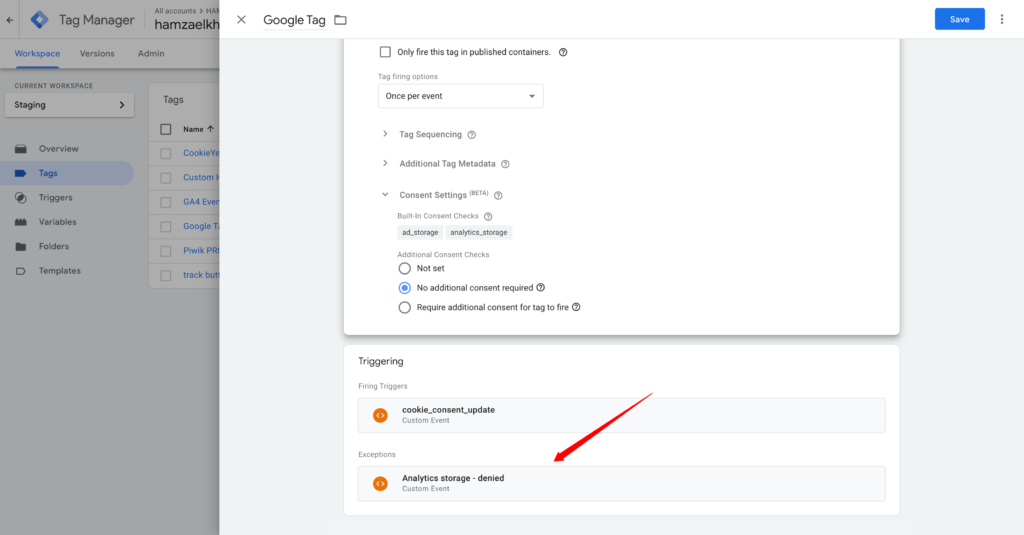
Tag Configuration Using Basic Consent Mode
In this case, the tag needs some type of consent before executing.
You can use a blocking trigger instead if you don’t want to use the consent settings.
Final Words On Consent Mode
Section titled “Final Words On Consent Mode”Google Consent mode is probably here to stay. For now, it’s only required for Google Ads and GA4 in case it’s linked to Google Ads. As we saw earlier, updating to consent mode v2 is as simple as adding the new parameters. Make sure to choose a consent management platform (CMP) that supports consent mode v2. There is a list made by Google of CMPs that integrate well with GTM.